What Is A LinkedIn Influencer Ad?
Okay, I know what you’re thinking; “What the heck is an influencer ad?! I’m selling IT Services, not organic face wash made from beeswax.” Let me explain further…
Sponsoring Employee Posts
You may have noticed that LinkedIn is pushing a lot of updates recently to help build up “influencers” on their platform. This started with the launch of their creator mode, which has led to tons of new features and experiments aimed to help these creators build their personal brand, as well as the brand(s) they represent.
Now, it appears that they have taken this one very massive step further, and have enabled the ability for a company to promote posts on behalf of their employees. There are a few conditions that allow this; one being that the employee’s profile must show active employment at the company associated with the ad account, and two being that the employee also grants permission through a request system. I will break down exactly how this flow works in the Tutorial section of this article, but for now let’s focus on the ads themselves.
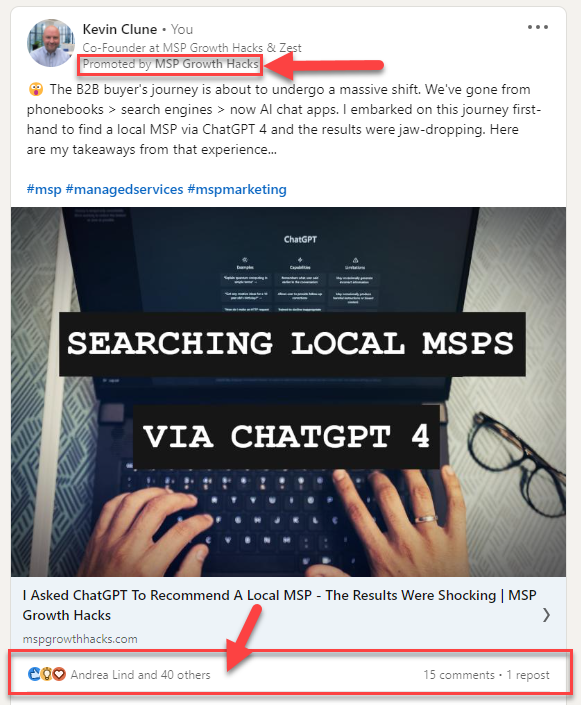
Here is what you can expect the promoted post to look like in the feed, which includes all of the organic engagement that the post initially received:

The Ultimate Guide To Cash Flow For Managed Services
Sponsored by Alternative Payments & Zest
Measuring Clicks & Conversions
Now that you have an idea of what an influencer ad consists of, I will begin to explain why pairing it with a CPM bidding strategy and a matched audience can produce a great ROI on your ad spend. Here is an example of a fairly new influencer campaign that I am running and the performance over the past 2 weeks. You will notice that even though the first campaign isn’t generating a lot of impressions (it’s a small, website retargeting audience), the click-through-rate for both campaigns are incredibly high for LinkedIn. This is the result we are looking for with influencer ads, which is not often achievable without this combination of CPM bidding / employee ad / and matched audience strategies.
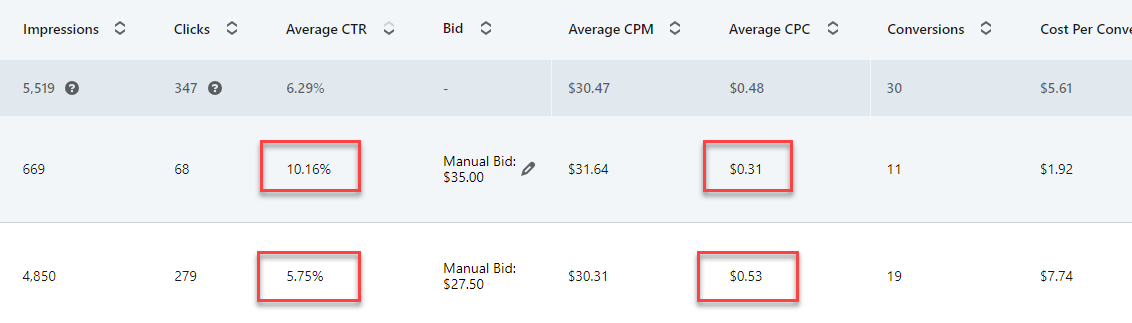
You may also notice that the traffic is converting at a high percentage and for a low cost. In these particular campaigns, I am measuring newsletter opt-ins as our primary conversion. I have found this type of ad particularly useful in moving an audience from the “awareness” stage to the “interest” stage of the funnel. In the case of your MSP, an ideal conversion may be an event registration, asset download, free scan / assessment, etc. Just make sure that the content that you are distributing in your post is optimized for your conversion.
Employee Posts vs. Company Posts
So what is driving these high performance results and how are these ads any different? I had the same question, but it wasn’t until I started running campaigns, gathering data, and comparing results did I really grasp what was happening here. Here is what I surmise as the primary value drivers behind this type of ad that in some cases might differ from a company post.
Organic Social Proof – Personal posts get more engagement, they just do. As I mentioned before, all of the organic engagement that is collected when the post went live initially will carry through directly to the ad. Now with a few clicks of a button, your best performing posts can also become your best performing ads, since all of that social proof is baked into the ad before it even goes live.
Grows Follower Counts – I have noticed that on the days that I am running influencer campaigns, my new follower count increases by at least 3x, if not more. Since I am using creator mode, I have also noticed that in some cases, the ad itself will have a “follow” button in the top right corner, which is no doubt contributing to this result. These count as “clicks” in the campaign results above, but are not captured as a conversion in my case. So in reality this is just a great byproduct of running these ads.
Added Brand Trust – People trust a face more than a logo. It is hard to dispute this. This is yet another reason why I believe these ads outperform those on a company page. This added trust helps remove the friction that comes with asking a visitor to do anything, whether it is to click a link, watch a video, or fill out a form, etc.
Native In Appearance – I can barely notice the difference between a regular organic post and one that is sponsored via an influencer ad. They did an incredible job of making it transparent, while also not making it so obvious that it erodes that brand trust mentioned above. It wouldn’t surprise me if this was eventually changed to become less native and more obvious, which is another reason why I have been pushing budget into these ads now while it is working.
Evergreen Use – While ads from a company post are also evergreen, I thought it was worth noting that the timestamp of when the post was originally public is removed on the ad and is replaced with the “Sponsored by [company]” line. This means that the post is now essentially evergreen and can be used for weeks, or even months, into the future. This is excellent news for anyone who’s ever had an incredible post that reached the end of its organic impression share, where it became just a memory on their profile feed. These ads allow you to breathe new life into these otherwise useless posts by putting them in front of new audiences.
So, are you ready to build your first campaign? I thought so. Here is a tutorial on how to build a matched audience and launch an influencer ad campaign using a CPM bidding strategy:
The Ultimate Guide To Cash Flow For Managed Services
Sponsored by Alternative Payments & Zest
Tutorial: Creating A CPM Influencer Campaign
Building An Audience
Before you set up your campaigns, you must first consider what audience you would like to show your ads to. I prefer to always use “matched audiences” at the audience level, and then filter those audiences even further at the campaign level. There are several different types of matched audiences that you can build on LinkedIn, but here are my preferred options and the steps to build them:
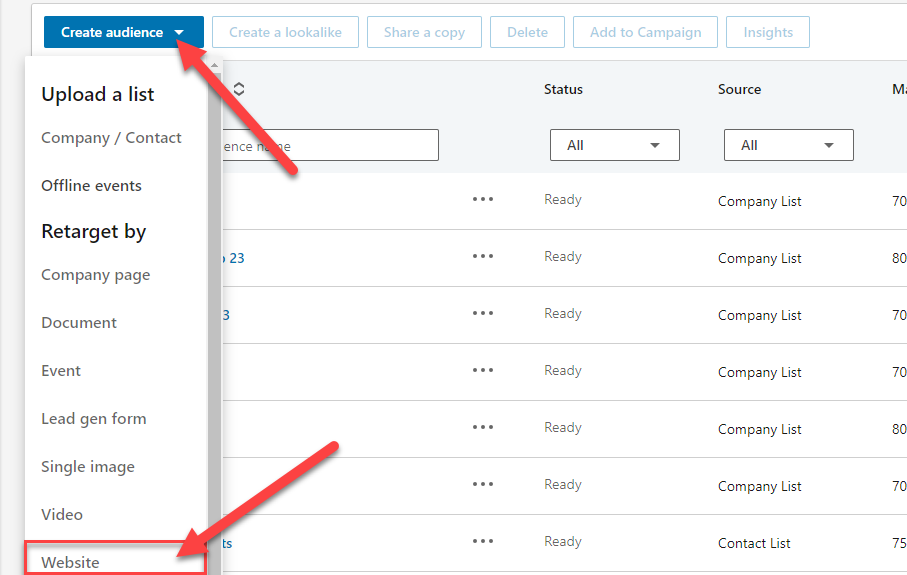
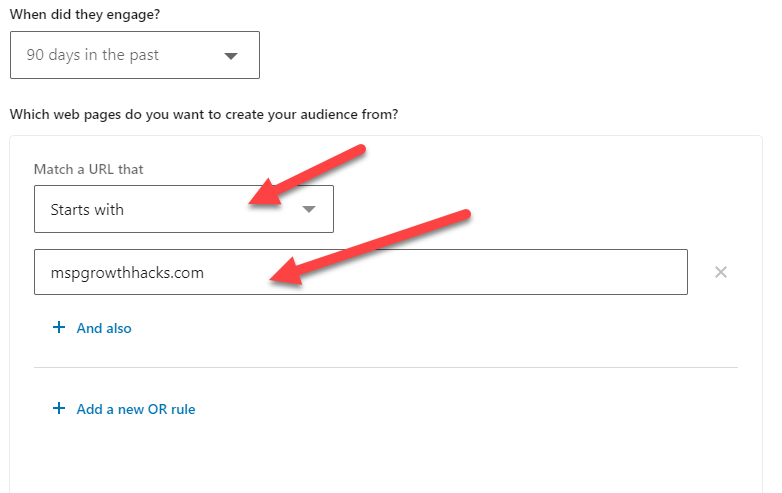
Retargeting Audiences – A retargeting audience is a collection of visitors that have previously visited your website and triggered the LinkedIn insight tag. If you do not know whether or not you have this tag installed, you can find instructions on doing so here. Once the tag is installed and active, you can build a retargeting audience by going to Plan > Audiences > Create Audience > Retarget By > Website.
From this point, you can choose specific pages or actions that you would like to use to build this audience, or if you just want to include all visitors across your domain, you can enter the URL manually and define it as “Starts with” then your domain, as shown in the screenshot below. If you don’t get a lot of traffic to your website, this is the ideal, because the audience will have to reach a certain size before you can use it in a campaign.
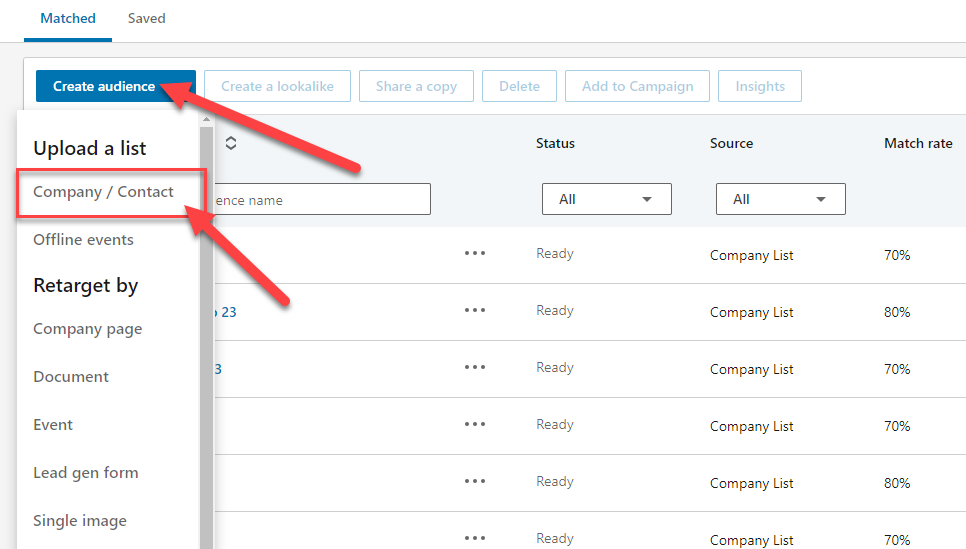
Company / Contact Lists – While retargeting audiences will often perform the best, they are difficult to scale since they rely on inbound web traffic to your site. This is why I typically use Company and Contact lists in my campaigns. A “Company list” is simply a list of company domains and a “Contact list” is a list of email addresses. Personally, I think company lists work best for influencer campaigns, because then you can start with a larger audience and filter it down when you are setting up the campaign. If you are curious about how you can build a company list for your service area, you can see this article I wrote recently on this exact process. Once you have your list ready, you can go to Plan > Audiences > Create Audience > Upload A List > Company / Contact.
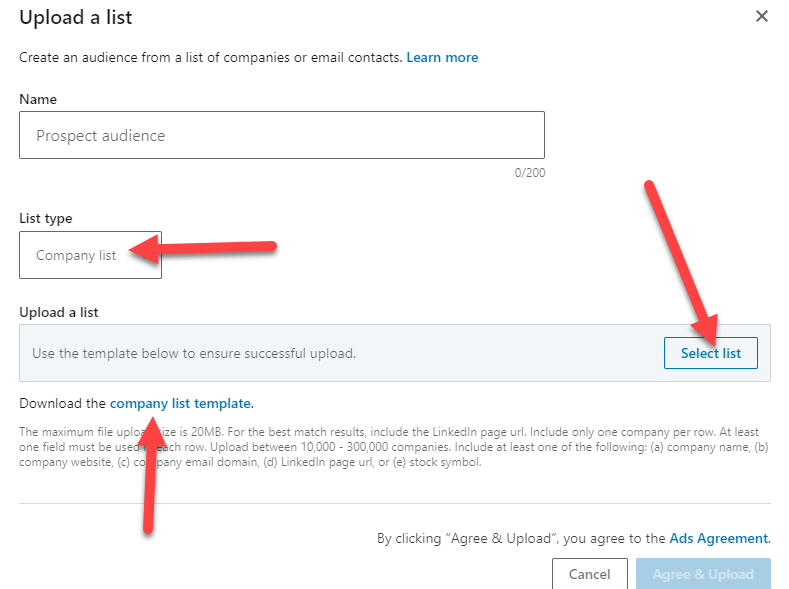
Next you will need to export the list template, copy and paste the domains or email addresses into the template, save, then select the list to upload. After you click “Agree & Upload” your audience will take a few days to build until it will be ready to use. This is why you should start this process well before you are ready to launch your campaign.
After you have successfully created your audience that you will use, you can then proceed to create your campaign group.
The Ultimate Guide To Cash Flow For Managed Services
Sponsored by Alternative Payments & Zest
Create A Campaign Group
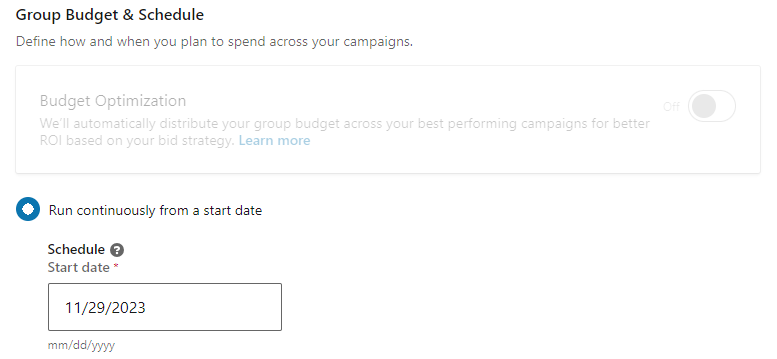
Group Objective – To start go to Advertise > Create > Campaign Group. Turn off the campaign group objective feature. If you choose an objective, it will force you to use specific bidding strategies, which is not ideal for this type of campaign.
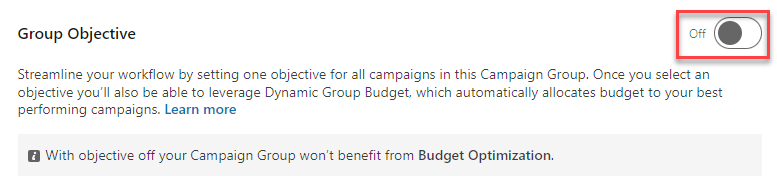
Budget Optimization – When group objective is turned off, you should see budget optimization automatically disabled as well.
The Ultimate Guide To Cash Flow For Managed Services
Sponsored by Alternative Payments & Zest
Create A New Campaign
Name your campaign – We typically separate campaigns by audience and bidding strategy, which tends to be ideal in measuring results. Therefore I use the following naming convention [Audience Name] > [Additional Filters] > [Bidding Strategy]

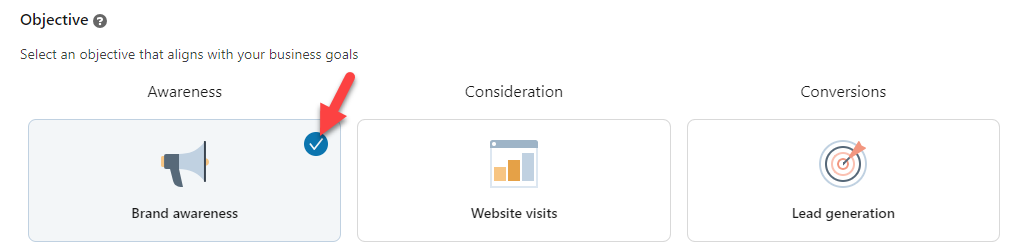
Campaign Objective – If you have a highly targeted audience built already and you want to use influencer ads to extend the reach of your post, you should choose the Brand Awareness objective.
Locations – You will need to add some kind of location filter to the campaign. This should typically be reflective of your service area. If you are in the USA, choosing the states that you service is a good starting point.

Select Your Audience – Next you will click “narrow” to narrow your audience further, then look for List Upload > Company Lists > Choose Your List. If you are looking to do a retargeting campaign, you would choose Retargeting > Website > Choose Your Audience.
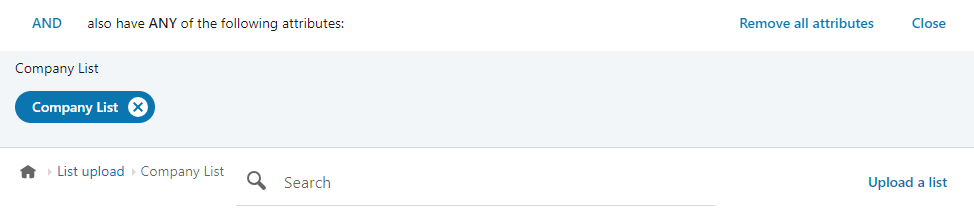
Add Audience Attributes – If you have uploaded a list of companies or are using a retargeting audience, it is a best practice to add additional filters at the campaign level. For example, you may want to only target companies within certain industries or of certain sizes. In addition to company targeting, you may also want to narrow down the individual’s job title, role, or seniority.

Audience Expansion – It is important to always turn off audience expansion when building this type of campaign. Afterall, you did all of the hard work in building the perfect audience, so you don’t want to give the platform the ability to “muddy” that up. Also, since we will be bidding on impressions, it’s important for the audience to stay as pure as possible to keep the click through rate high and the costs low.

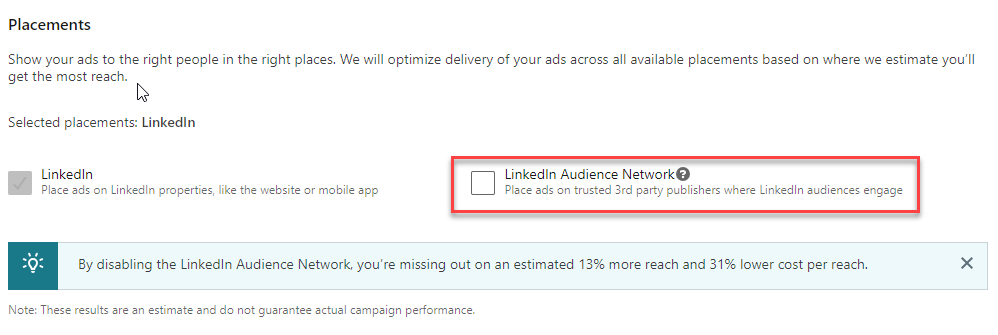
Placements – I prefer to disable the LinkedIn Audience Network to restrict the ability to show the post on sites other than LinkedIn. In my experience, this does not perform well and can give mixed results with the bidding strategy we will be using.
Budget & Schedule – I think of daily budget and schedule as the “pace of delivery” for the ads. This is because LinkedIn doesn’t have a way for you to only spend during business hours, which is when most of the high quality impressions are available. Also, since ad delivery is a game of supply and demand, the costs tend to be lower during the morning hours when there is a higher supply of impressions available. After business hours, there are fewer users on the platform and therefore the supply drops significantly and costs go up. This is why I simply manually turn on and off my campaigns, just like clocking in and out for the day.
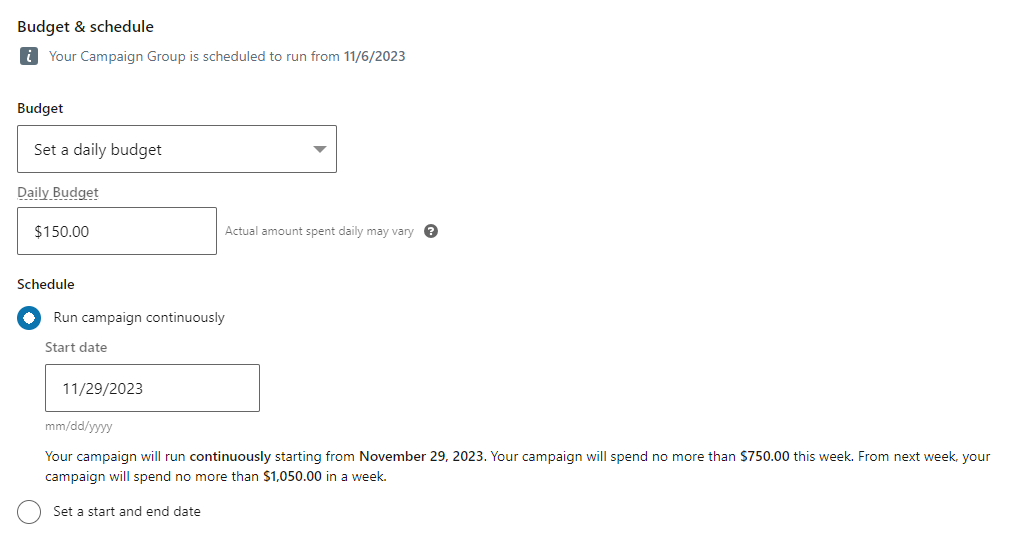
Bidding Strategy – This is possibly the single most important step of the process. We want to change the optimization goal and strategy to manually set our CPM bid. Click “change” then select impressions under optimization goal. Then on bidding strategy, click “show additional options” and select manual bidding. I would start with $25 and then increase or decrease it based on whether you need more or less ad delivery.
We choose a CPM strategy because we want to get our click costs below the minimum allowed to bid. For example, the minimum click cost I can bid on in this particular campaign is $5.00. Our goal is to cut that by over 90% and we accomplish that by having a highly relevant audience and bid on impressions (not clicks), hoping for a higher than average CTR, and thus a low click cost. This is the name of the game, as we are essentially betting on the fact that the post will perform well with the audience that you’ve targeted and when successful, you are rewarded for that bet.

Conversion Tracking – You should be tracking some kind of conversion for this campaign, however this topic is really an article in itself. If you have conversion tracking set up, select it.
The Ultimate Guide To Cash Flow For Managed Services
Sponsored by Alternative Payments & Zest
Select Your Influencer Ads
Now we get to the fun part, as we will be “requesting” access to employee’s post for use in sponsored campaigns.
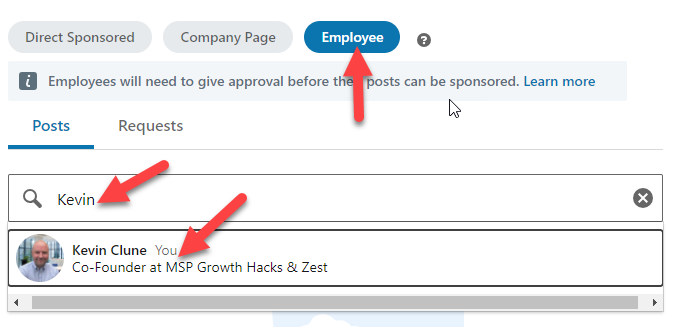
Browse Existing Content – When you get to the Ad section of the campaign setup, the first thing you will want to look for is the ability to “Browse Existing Content”

Employee Posts – Next you will locate the “Employee” tab on the left, and search for the employee who’s post you would like to sponsor. It is important to note that the only people that will show up in this search are those who have their profile set to be actively employed by the company associated with the ad account.
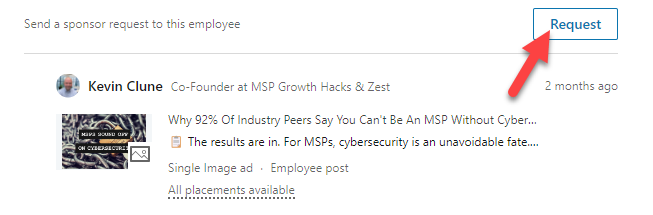
Request Sponsorship – Locate the specific post that you would like to sponsor and click the “Request” button. This then sends a request of approval to the employee so that they can grant permission for their post to be used as an ad.
Approve Sponsorship – Head to the requests tab to see the status of the request, which will show as pending until approved. If you are trying to sponsor your own post, you can just click the “Copy Link” button and paste it in a new tab, which will take you right to the approve page.
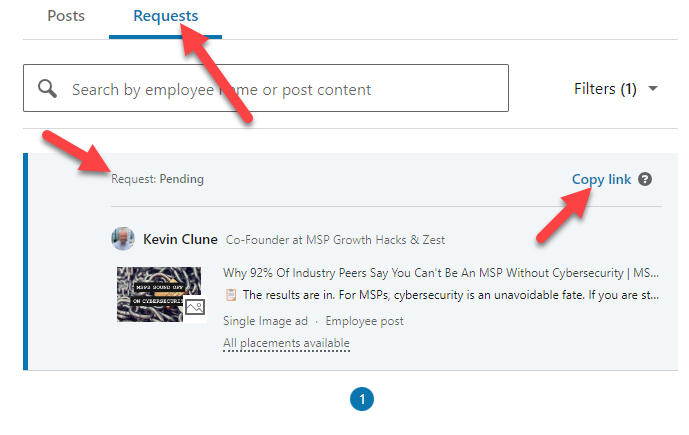
Add To Campaign – Finally, once your request shows as approved, you can check the box next to the post and then click the “Sponsor” button in the lower right corner. This adds it to the campaign as an active ad. Once that is complete, your ad will go through LinkedIn’s approval process and will start actively running once it is cleared.
The Ultimate Guide To Cash Flow For Managed Services
Sponsored by Alternative Payments & Zest
Final Thoughts
I have talked to many MSPs that feel as though they have been burned by LinkedIn ads before. They put anywhere between $250-$1000 into a campaign, only to get a bunch of empty impressions with few results. Most often, this is just because their execution does not live up to their expectation of results. Influencer ads are the perfect opportunity to dust off those LinkedIn ad accounts and give it another shot. In fact here a few ideas for small scall campaigns that you can use as a test.
Existing Customers – Create a company list of all the companies that you have ever done business with and promote your posts to this audience to boost your engagement and stay top of mind for referrals.
Local Chamber – Create a company list of all the companies in your local chamber of commerce and promote your posts to this audience to transition in person connections to virtual connections.
Existing Web Traffic – Create a retargeting audience for your website traffic and promote your posts to this audience to help build trust for those that are actively evaluating your company.
Don’t think of these as typical ad campaigns, but instead as a way to simply extend the reach of your posts to a targeted group of people. If you start by taking your best post that you’ve made over the past year and put $100 into showing it to a new audience that you wish could have seen it in the first place, you almost can’t go wrong (assuming you have the right expectations). The engagement rate will be less than it was when it was posted organically, but more than it would be if it were posted via your company page.
SPONSORED BY ZEST


