
The “Perfect” Audience
Many of you have likely read the title of this post and are asking yourself, “why would I want to pay for ads to the customers that I already have?” This is a great question and makes for the perfect starting point to explain this strategy.
Before I do that, I want to point out that LinkedIn now allows you to sponsor (or as some call it “boost”) posts from a personal LinkedIn profile. Up until this point, this feature was only available when using a company page. I have covered the benefits and details of these “influencer ads” extensively in a recent article, so if you haven’t read that yet, I highly recommend it before moving any further.
Now back to the head-scratchers. The reason I have deemed the companies in your PSA as the “perfect” audience is because you literally can’t get any closer to your ideal client profile than your actual clients. It is my opinion that showing your posts to employees of companies that you’ve already transacted with has a ton of upside. Here are a few of these benefits:
Increased Engagement
Since you likely have had face-time with companies that you’ve already done business with (and they know your brand), this tends to be a very warm audience. Generating additional impressions of your post to this audience will yield a significantly higher engagement rate compared to a cold audience. Each act of engagement generates a social signal that will yield additional impressions of the post. So as an example, 1,000 paid impressions w/ high engagement can produce 5,000+ organic impressions. Without the engagement, this simply does not happen.
2nd Degree Referrals
While organic reach is great, it can be somewhat worthless if it’s the wrong audience. The best part about these additional organic impressions is that they are 2nd degree connections of your existing customers. These would be the companies that your customers would eventually refer to you, which is how the majority of MSPs grow their business. In this case, you are getting in front of them before that even happens, which can accelerate the process.
Upsell Opportunities
If you are an MSP, you are likely posting about whatever the latest challenges are impacting your customers and the solutions that you’re providing to resolve them. If you’re not, then let this be the motivation to start. In fact, I would treat the companies in your PSA as your primary audience and speak to them directly when creating posts. This will make them tune-in even more, leading to upsell opportunities on additional services.
Revived Relationships
If you’ve browsed the companies in your PSA recently, you have probably realized that they are not all active customers that are under contract. Some companies may have used your services on a T&M basis, or for a major project that has since been completed. Maintaining constant visibility with these companies can help to revive those relationships and puts you top of mind the next time they require IT services.
Building Your Audience
Now that you’ve hopefully been convinced that this is worth a shot, let’s dig into the details of how to actually make it work:
Exporting Your Data
The first step in the process is to export a list of companies from your PSA. Since not everyone uses the same PSA, this process may vary, however the goal is to acquire the company domain (ie. ‘domain.com’) of the customers in your system. There are two key pieces of data that will contain these details, which can be used to extract what you need :
- Website URL – Hopefully you have entered the website URL when entering your customers into the PSA. If so, pulling the domains out of the URLs should be fairly simple. If you do not have this information, there is another way, however let this be a motivating factor to start entering it moving forward.
- Email Address – The next best piece of information that can be useful to extract the company domain is an email address. If you are pulling a list of companies, an email address can likely be found associated with the “Primary Contact.”
Once you have a spreadsheet that contains either of these two pieces of information, then you are ready to take the next step.
Extracting Company Domains
Next, you are going to use a formula in Excel (or Google Sheets) to extract the company domain. This formula will vary slightly depending on what type of data you are working with and how it is structured. The header of the column that you will put in your company domains should contain the word ‘companywebsite’ in all lowercase letters and with no spaces. You may also grab a template from LinkedIn, however this should suffice.
- Using Website URL – If you are working with a list of website URLs, you will need to remove the ‘https://www.’ prior to the domain, as well as the ‘/’ and anything that comes after the domain. That formula is as follows:
=IF(ISERROR(FIND("//www.", A2)), MID(A2, FIND("://", A2) + 3, IFERROR(FIND("/", A2, FIND("://", A2) + 3), LEN(A2) + 1) - (FIND("://", A2) + 3)), MID(A2, FIND("://www.", A2) + 7, IFERROR(FIND("/", A2, FIND("://www.", A2) + 7), LEN(A2) + 1) - (FIND("://www.", A2) + 7)))If you are receiving an error or missing value, it is likely because the formula is looking for a ‘/’ or other character that is not present in the original data. If this happens, simply tweak the original data or the formula until you get it working.

- Using Email Address – If you have a list of email addresses, you will need to split the data after the ‘@’ sign and remove the first half prior to the company domain. That formula is as follows:
=MID(A2, FIND("@", A2) + 1, LEN(A2) - FIND("@", A2))This method is often less prone to errors since there are fewer variations, however you may run into challenges if there are unexpected subdomains in the email address.

Once you have a working formula, and you’ve extracted the domains into a single column, copy that column and paste it into a new sheet. Since you’ve used a formula to populate the data, you will need to use the “Paste Values” option, otherwise you will be pasting a non-working formula.

Finally, save your new sheet containing only the company domains as a .CSV file and you are ready to upload!
Uploading Your List
From your LinkedIn Ads Campaign Manager, find the Plan > Audiences tab in the menu on the right hand side and select ‘Create Audience.’

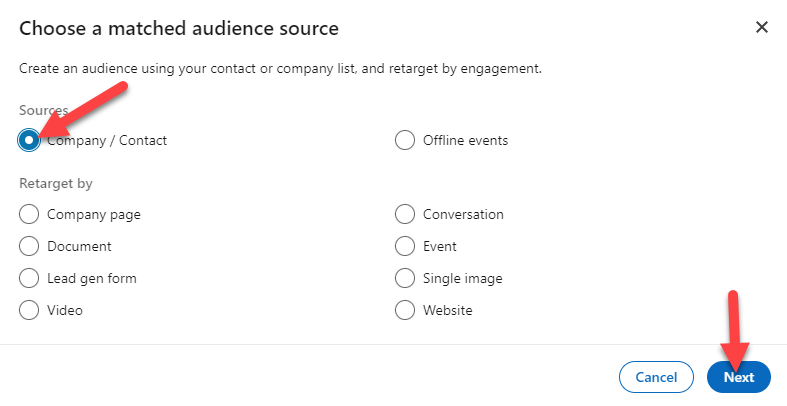
Next, select the option for ‘Matched Audience’ and then ‘Company / Contact’ as your sources.
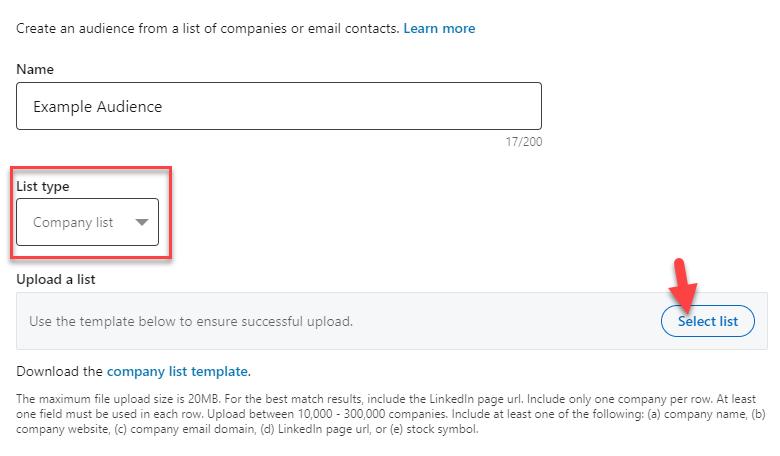
Finally, name your audience, select ‘Company’ as the list type, and upload your .CSV file.
Congrats! You now have a LinkedIn audience containing all of the companies in your PSA.
Audience Automation
Uploading a list is great, but wouldn’t it be better if this all happened automatically every time a new company was added to your PSA? I can tell you first hand that this is without question a better way. The good news is that there is a rather simple solution for this.
Creating A “Zap”
The easiest way that I have found to connect your PSA to a LinkedIn Ads audience is by using Zapier. Since this is a multi-step Zap, it will likely require a paid subscription, however I have found that getting value out of that cost is not difficult.
Listen For New Customers
To start building your Zap, you need to add a ‘New Customer’ trigger first. This is what kickstarts the automation process. Not all PSAs have a native Zapier integration, but for those that don’t, they may have a secure webhook that can be used for this instead.

Reformat Data
Just like in our Excel spreadsheet, we will need to reformat the data so that it is acceptable for matching a company in LinkedIn Ads. This can be achieved using Zapier’s “Formatter” tool. In this example, I am going to use the email address field as the input, and an ‘Extract Pattern’ in the Formatter to pull out the company domain. The pattern should consist of the following characters:
@(.+)
Build New LinkedIn Audience
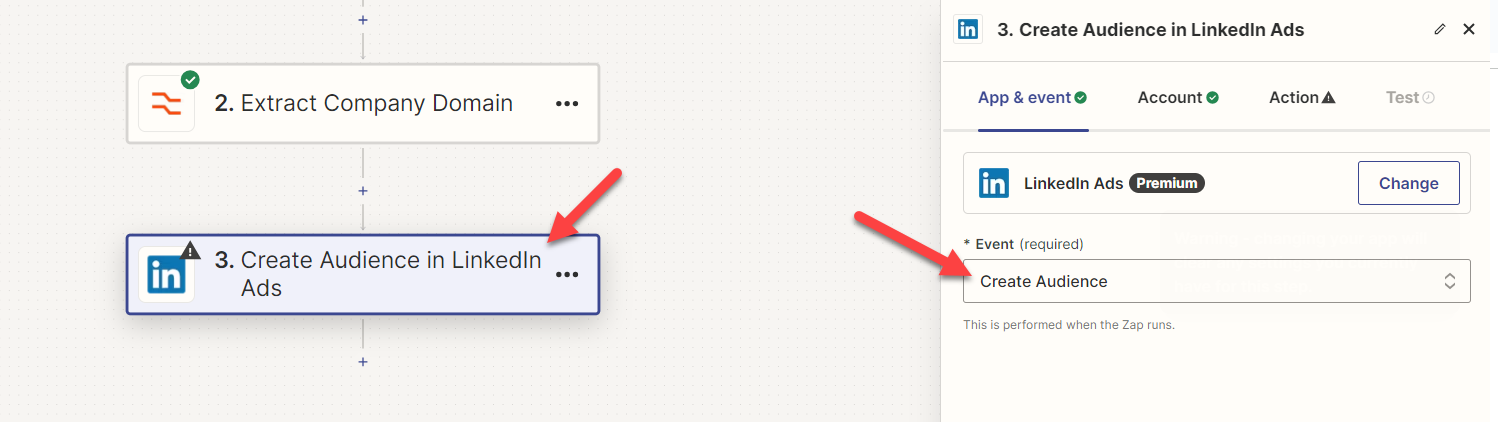
The next step is probably the most important and if ignored, it can cause several issues. Zapier will only allow you to add companies to an audience that was created by Zapier itself. This is why we will need to add the LinkedIn Ads integration and use the ‘Create Audience’ event next to set up a new audience for these companies to get deposited into. The problem is that you do not want to create a new audience every single time this workflow fires, so you need to add this event > test it to create the audience > and then remove the event after the audience has been created.
Add To LinkedIn Audience
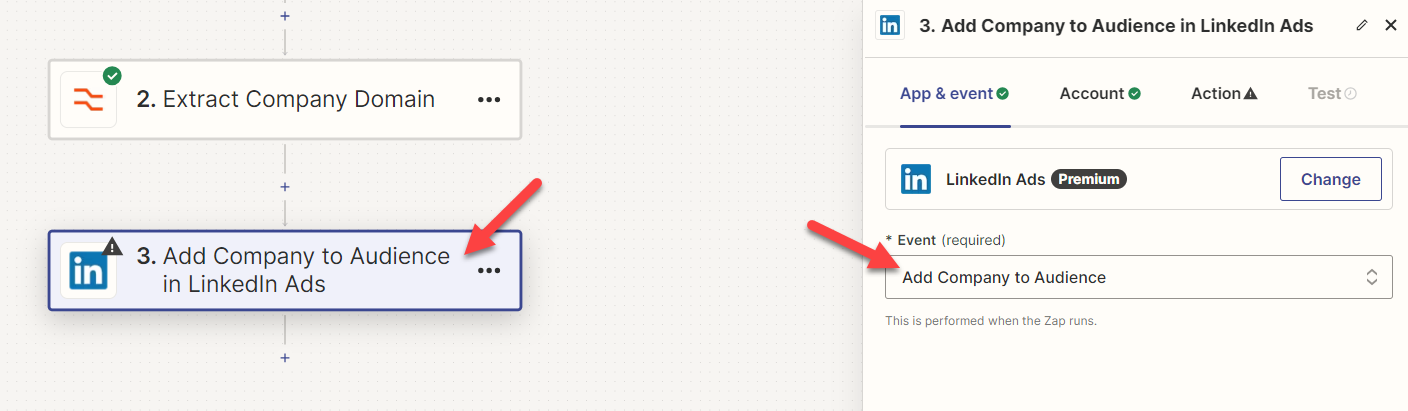
Finally, you can add the LinkedIn Ads integration again, only this time selecting the ‘Add Company to Audience’ event. As you continue through the action tab, select the audience that you have just created on the last step and choose the output from the Formatter as your input into the ‘Website Domain’ field.
Finally, test the workflow all the way through to see if it works. Here is what the final path should look like.

If successful you should now have an audience that will automatically grow as new companies are added to your PSA.
Campaign Launch
Once your audiences are done building and they are of an appropriate size, you can launch your first campaign. Here’s a few tips for getting started:
Campaign Structure
As I mentioned in the beginning of the article, I have already published a full tutorial on how I typically structure my campaigns. This includes the objectives, settings, and bidding strategy. I highly recommend checking that out and following the instructions there to set up your campaign. What I will reiterate here is that you know that the audience that you’ve created is highly relevant to you, therefore, make sure that you always bid manually. If you give LinkedIn Ads the freedom to set your bid for you, they will gladly take more of your money for results that could have been achieved for far less.
Audience Insights
Aside from the content distribution, having this data available in LinkedIn Ads will also unlock some great insights into who your customers are, what industries they participate in, what roles they play, and what interests them. This can all be found by clicking into the audience from the Audiences tab, once it contains over 300 members. Use this information to inform the content you create, as well as creating lookalike audiences that contain similar attributes.
Content Creation
Now that you have a turnkey audience to distribute your content to, it is important to speak to them directly whenever you post. Also consider adding call-to-actions that will get them to engage, such as virtual or in person. If you offer them the opportunity to participate, some may choose to do so, which is a great step toward building a community around your brand.

SPONSORED BY ZEST


